This was shown in the tutorial, but there some additional facts worth mentioning. To connect to the server on your own computer, the default host name of "localhost" is sufficient. For a multiplayer game you will need to have from the person running the server the Internet address of the server, either a numeric address such as 11.22.33.44 or a name such as mysystem.mynetwork.net. The Name field is the name by which you identify yourself to the server operator; for an initial connection to a game it may as well be your ordinary name or user name (e.g., "david"), but if you are reconnecting to an existing game it needs to be the the ruler name of the empire ("caesar").
The Connect button will make the connection to the server. The Metaserver button will open the Metaserver Window.
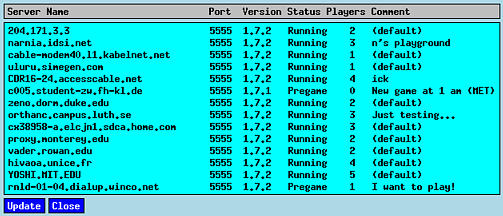
| This is opened from the Metaserver button of the Connect Window. When it is opened, the client sends a request across the network to the metaserver, which replies with status information for all running Freeciv servers on the Internet. The window then displays the information received. If you click on a server's line, its name/address and port number are copied into the Connect Window. The Update button re-requests the data from the metaserver. |
|
The main window is described at length in the tutorial, but there are a few elements that were not covered at that time.
The line at the bottom was referred to as the "multiplayer chat line."
It is to be used to communicate with other human players.
During play, move the cursor into the main window or click on it
and type, for instance,
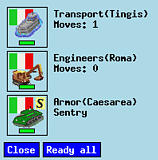
| In the event that there is more than one unit in the same square on the map, the stack is marked with a small plus sign in the lower right. This can be the case for land units or, as in this case, sea units with land units as passengers. To select one of the units in the stack, click on the stack and a unit list window will appear. Click on the unit of your choice to activate it, or the "Ready all" button to activate them all. |

|
|
The "Turn Done" button does not truly end your turn, although in a solitaire it has that end result. In the solitaire game your "Turn Done" causes the AI players to make their moves and signal their completions; after all players have signaled "Turn Done" it performs the turn update and all players start anew. In a multiplayer game, the button likewise sends the turn completion signal, but that does not prevent you from continuing to use the windows to control your game. Until the last player has pressed "Turn Done", all players are free to do whatever they wish, from reading help, to examining units, to making changes in cities, even to making new attacks. Players do run the risk of not being able to make all of the orders they wish before the update takes place; it is best to signal Turn Done when you have entered what you think are the important orders, and do only unimportant maintenance tasks in the delay before the update.
It is possible to use the main map window to rearrange workers, as you can from a city's window. Use the 't' key to cause the map to mark worked squares in a different color; in this mode, shift-left click to adjust workers in the same manner as the city's map.
A grid may be added to the main map, showing exactly where the squares are. With the pointer in the map window, press Control-G to toggle the grid on or of.
The list of citizens can include happy, content, and unhappy citizens, followed by any entertainers, tax collectors, and scientists. You cannot directly change the morale of working citizens, but you can shift between specialists and workers, and change specialties. Changing between worker and specialist was shown in the tutorial; until your city reaches size 5, it cannot have scientists or tax collectors. To change a specialist's job, click on its icon; an entertainer will change to a scientist, a scientist to a tax collector, and a tax collector to an entertainer.
While a building or unit is being produced, you may rush its completion by pressing the Buy button. That will cause it to be completed in the next update, at an immediate cost in gold. You can also change from producing one thing to another, by clicking on the Change button as you did for new production; there will be some costs and constraints enforced by the server.
You may sell an unwanted building by clicking on it in the list of buildings, and clicking on the Sell button.
The Rename button opens a window to allow you to change the city's name.
The Trade button opens the Trade Window.
The Activate Units button awakens every unit within the city.
The Unit List button opens a small window showing each of the units present in the city; each is given with its home city, its movement status, etc. It is the same window as shown earlier for selecting one of several units in a square. You may click on the icons to activate the unit, or click on "Ready all" to activate them all.
The City Options button opens the City Options Window.
Clicking on the central square of the map window causes the server to reallocate all of the workers as it sees fit.
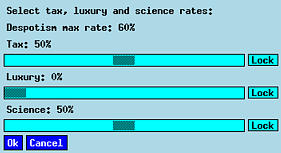
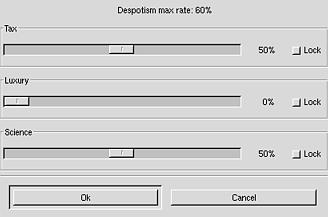
The rates window shows you the current division of your trade into taxes, luxuries, and science. You may use this to adjust your rates, up to the limit allowed by your government type. In any of the scroll bars, using the Xaw client, you may single left click to reduce that rate, or single right click to increase that rate. Using the Gtk client, use single left clicks either to the left or the right of the scrollbar to move it. Reducing the rate a step increases some other rate a step, and likewise when you increase one rate. You may set the Lock button on any rate which you don't want this automatic adjustment to change.
|
|
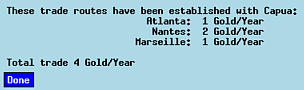
| This is brought up from the "Trade" button on the City Window, which is only active if the city has established trade routes. It shows all of the trade routes and how much money each route earns. |
|
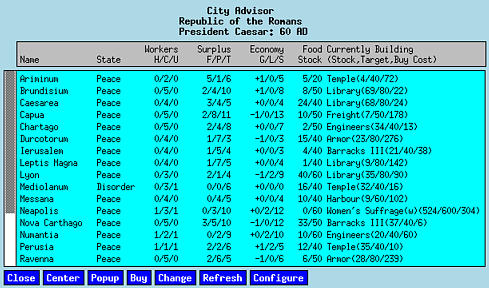
This is opened from the main window Reports menu option City Report. It shows all of your cities and one line of summary data about each. The "State" field is "Rapture", "Peace", or "Disorder" for the morale states "I Love The President Day", ordinary morale, and uprising, respectively; see that Mediolanum is in Disorder. The "Workers" field shows a count of the happy, content, and unhappy workers; notice that Mediolanum and Neapolis have unhappy workers, though Neapolis probably has an entertainer. If there are specialists, the numbers of entertainers, scientists, and tax collectors are shown. The "Surplus" field is the surplus counts in food, production, and trade; a glance at this will warn you of cities with negative net food supply. The "Economy" field is the trade division into gold, luxuries, and science; many cities have negative gold because taxes are low. If there are trade routes or pollution, they are shown in other columns. The "Food Stock" column shows the contents and size of the food store. The building or unit under construction is shown last, with its production points already complete, target production points, and "Buy" cost.
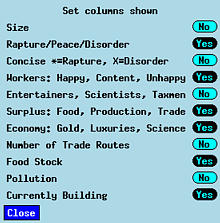
| The Center button centers the map on the city. The Popup button opens the City Window for that city. The Buy button is the same as pressing the Buy button on the selected city's window. The Change button is the same as pressing the Change button on the selected city's window; this means that you see a list of buildings or units, and must select one. The Refresh button requests that the server update the data in the list. The Configure button opens a window to configure this window. It allows you to regulate which of the possible columns are shown, or to what level of conciseness. |
|
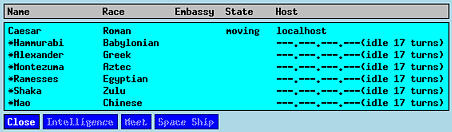
The Players window is opened from the main window menu.
It shows all of the players in the game by ruler name and empire
name; an asterisk beginning a ruler name indicates that it is an AI.
Players will show up here even if you have not seen them within the game.
If you have an embassy with that race, that column will have an X and the
Intelligence and Meet buttons will activate those windows.
The State column indicates whether, with regard to the current turn, that player is
still moving or is done.
Players currently connected by clients have their IP address listed;
those not connected show how many turns they have been offline.
The "Intelligence" button opens the Intelligence Window.
The "Meet" button opens the Meeting Window.
| This is brought up from the main window menu bar. It gives a summary of the empire-wide income and outflow of money. First it lists all of the types of buildings you have built, their count and their maintenance costs. Then it summarizes your tax income from all cities and your total building costs. The "Sell Obsolete" button goes through every city and sells the selected type of building, but only if the building is obsolete (for instance, as an ancient Barracks is made obsolete by the development of Gunpowder) or superseded by a Wonder of the World (as the Pyramids makes all Granaries unnecessary). The "Sell All" button sells all of that type of building, obsolete or not. |

|
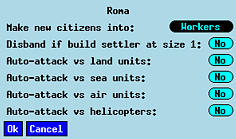
| This is brought up from a city's city window. It allows you to set some server-maintained options relating to city operation and defense. By default, new citizens in a city become workers; you may change this to make them scientists or tax collectors. You may change whether or not a size-one city building a settler results in the disbanding of the city. By default, units within a city will remain there; if attackers come, the units will stand and defend as they are. This window allows you to set some criteria under which units within the city will automatically attack enemy units near the city, if the units have also been placed in "auto-attack" mode. |
|
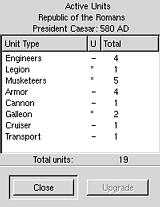
| This is brought up from the main window menu bar. It lists what type of units you have and how many of each you have; in the example it also shows an asterisk for Legion, Musketeers, an Galleon, showing that they can be upgraded. The "Upgrade" button offers you the chance to upgrade some or all of the selected unit types for a price, if units of those types are present in the city. Upgrading is possible for many units based on the rules, when the ability to make the better unit has been discovered (for instance, Settlers may be upgraded to Engineers once Explosives have been discovered). You might check this to be sure you don't have forgotten fortified ancient units in the modern age; for instance, that Legion is just wasting support with Armor units around. |
|
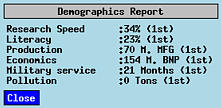
| This is brought up from the main window menu bar. It lists several empire-wide statistics, and gives you a ranking by which your empire compares with the other empires. |
|
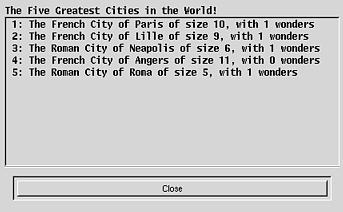
| This shows the five greatest cities in the world. |
|
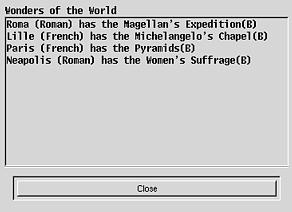
| This shows all of the Wonders of the World. |
|
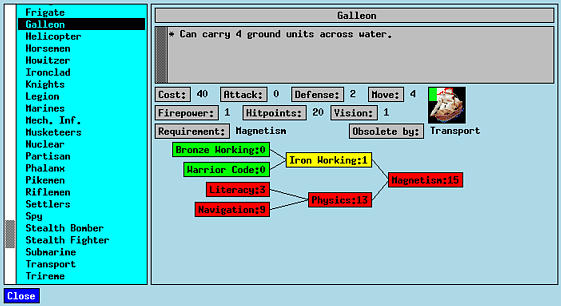
The help window is displayed from the main window menu bar. There is help available in many categories, from units and buildings to concepts such as combat and happiness. Regardless of which category you select, the left edge scrollbar lists all of the help which is available, in all categories. Click on a unit name, building name, form of government, or whatever your interest is, to bring up its help page. The help pages themselves may contain scrolled data, as this does (note the scroll bar). Help pages for units and buildings list their critical statistics and technological prerequisites.
The help pages for buildings, units, and civilization advances include a map of the advances required to produce the item. Note that for the Transport you must have Magnetism, displayed in red, meaning that you don't know that advancement and aren't close enough to have it listed as an option for research; it is 15 research steps away from what you have researched already. Its predecessors are Physics and Iron Working; Physics is 13 steps in the future, but Iron Working is only one research step away, and indeed is marked yellow to say that it can be researched right now. The advances Bronze Working and Warrior Code have already been discovered.
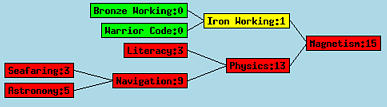
You may use this interactively to plan your research. One of the prerequisites for Physics is Navigation; the graph shows that it is 9 steps away, but doesn't show what you need to get to it. A click on the Navigation box redisplays the window to expand its prerequisites. If showing the earlier advances would exceed the space in the window, the later ones are pushed off to the right; to get them back, click again on an intermediate advance (such as Navigation); its prerequisites will disappear, leaving room for those displaced.
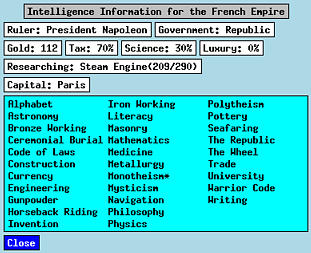
| This is opened from the Intelligence button on the Players window, only for a civilization with which you have an embassy. It shows some useful data about the race, mostly about the state of its civilization advances. Note the asterisk with Monotheism; that is an advancement that the other race has and you don't, so you know something you might want to bargain for. |
|
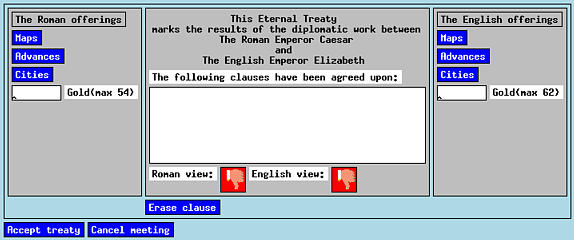
The Meeting Window comes up from the Meet button of the Players window; recall that this is only available between human players, as the AI players don't do diplomacy. It automatically comes up for both players involved in the meeting, and both will then use his or her window to negotiate a treaty. The left column of the window has buttons with which the window user may offer gifts to the other player; the right column has buttons to request gifts from the other player. The center contains all of the clauses so far offered by either player.
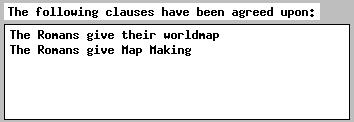
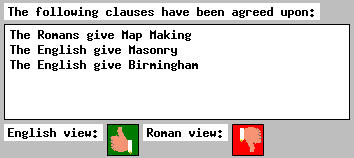
| Let's suppose the Romans want to make a few offers and see what happens. Each of the blue buttons is a menu. Caesar would use the "Maps" menu and select the option to give the entire worldmap as known to him. He might then use the "Advances" menu, which pops up all of the advances that the Romans have and the English don't; in this case he offers Map Making. The box in the center on both player's windows now shows these two clauses. |
|
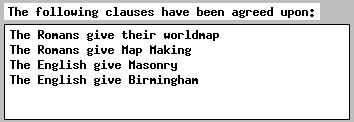
| Elizabeth has the chance to examine the Roman generosity and come up with a counter-offer. She could accept the gift as it is by pressing "Accept treaty", but the Romans would probably not accept it as is and would demand changes. They could do so by using their right-side buttons to add clauses offering English assets to Rome. She will make some offers of her own instead, using the Advances and Cities buttons to offer Masonry and Birmingham. |
|
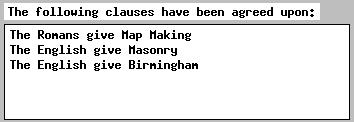
| Caesar can see that the English are overcome with his magnificence, and will try to see how far he can go. Selecting the first line of the treaty clauses and clicking on "Erase clause", the Roman offer of the world map disappears from both player's windows. |
|
| Elizabeth could use the right buttons to add clauses of Roman gifts, or could delete clauses from the treaty, or end the meeting entirely. Instead, she clicks on "Accept treaty", which causes the "English view" red thumbs-down symbol to change to a green thumbs-up symbol on both windows. |
|
| Caesar sees an entirely acceptable treaty, and clicks on "Accept treaty" also. The meeting window disappears from the view of both players, and the server will implement the transfers given in the treaty. They will both immediately see in their message lists messages informing them of the changes that took place. |

|
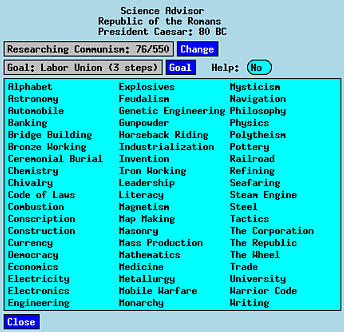
The Science Report comes up from the Science Report menu option, or when an advancement has been completed. It has the same controls in both situations. Notice that the player is currently researching Communism, which is necessary for the goal of Labor Union. There is no need for the current research and the goal to be related; you may change either of them at any time. The goal is only used when one advancement is completed and the server automatically starts the next advancement towards that goal.
Also note the "Help: No" button. Switching this to "Yes" will give you a help window on any advancement on which you click in the lower list, and also on any advancement you select in the Researching or Goal lines.