Turn your attention back to the main map window, where the current unit should still be patiently flashing. If it is not on the screen, press "c" to center it. What you will do first is to build your first city, then start the other units exploring.
The current unit is probably the Explorer. Let's switch the current unit to be one of the Settlers (even if it is already, try this out): Click on the stack of units on the map, and you will see a menu of units pop up. Click on one of the Settlers. Now the Settler is the one flashing on the map. The row of units in the bottom left should now show the Explorer and the other Settler.
In later games you may do a bit of hunting for a perfect city site, but for this game the starting point is quite good. You've been wandering for hundreds of years, and it's time to settle down.
Take a look at the second menu button, marked "Orders"; that menu lists commands relevant to the selected unit. Press and hold the left mouse button on the Orders button; you will see a list of menu options pop up. Some of them will be grayed out; they aren't available to the selected type of unit, or aren't available for the terrain it is in, or are otherwise not appropriate. One of the available options is "Build City". Notice that next to the name is the shortcut "b"; you could have done this by just pressing the "b" key. This was just to show you the menu.
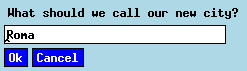
| Move the cursor down to the "Build City" line and release the mouse button. You will get a dialog asking how you want to name the city; it will already have a default name, taken from a list of built-in names of cities suitable for that race. Click OK. The dialog box and the unit will disappear, and in its place on the map will appear a new city. At the same time the city window will appear, so that you can give your first commands to the new city. |
|
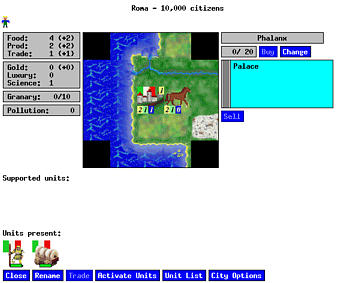
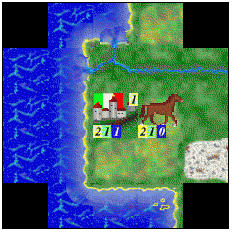
| The left column of the window shows, first of all, a row with one icon in it, representing the one citizen of the city. It is the icon of a "content" citizen; as the game progresses, and the city's population grows, this line will lengthen with other citizens, happy, content, unhappy, and specialists. |
|
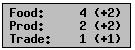
| Below is a box containing the critical raw productivity statistics of the city. The first line describes the food production of the city; in the example the city will produce four units of food, which is a surplus of two over the amount needed to feed the one citizen. The second line describes the industrial production; the city will produce two "shields" of output, and the second number is the surplus over the amount required to support units. The third line describes raw trade; the first number is the raw trade including the amount lost by corruption, and the second is the real, effective trade, after corruption takes its toll. |
|
Note that most of the statistics on the window are predictions based on the current state of things; actions you can perform (such as reallocating workers) can change the amounts of food, production, and trade the city produces in the next update.
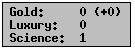
| The next box shows the trade output of the city, as divided by your tax rates, and taking into account special buildings and specialists. The "Gold" line shows the number of gold coins of taxes the city will collect, followed by the surplus it will contribute. The "Luxury" line gives the coins of luxuries produced for the city's citizens, and the "Science" line the coins worth of research points contributed by the city. Since you have the science rate set at 60%, the one coin worth of trade will go to science; once the city produces two coins, the second will go to taxes. |
|
Below that is the city's food storage (called a "Granary" whether or not you have built a Granary building in the city). It gives the number of stalks of food stored, and the size of the city's food store. The latter number is the point at which the city increases its population. It appears as if in five turns you should have a full food store. Next is the city's pollution level, which is zero.
Below that is a list of unit icons, representing the units which are supported by the city, regardless of whether they are present within the city or are elsewhere on the map. Depending on the government you have, cities have differing requirements to spend production and food supplying units. At this point in your game, the city supports no units; the two units you have are not owned by any city. Later in the game, beneath each unit icon which requires support will be a tiny shield and/or a tiny food stalk to show the resources that the unit is draining from the city.
Last on the left column is a row of icons representing the units physically present in the city, regardless of what city supports them.
| In the middle of the window is a map of the area immediately surrounding the city, showing only the 21 squares which are considered within the "radius" of the city. Each square shows the terrain of the square, with any modifications such as roads and irrigation, just as shown on the main map. The central square is the city itself; the tiny "1" in the upper right shows the size of the city. The three small numbers "2 1 1" below it show how much the square is producing in food, production, and trade, respectively. Note the square to the right, with the horse; it also has the three numbers under it, "2 1 0", showing that it is where the city's one citizen is working, and how much it is getting from its work. |
|
You will use this map to move citizens from working one square to another, or to take them out of the fields entirely to become specialists in the city. At this point the city is too small to have specialists be worthwhile, but you can move workers around, and they become specialists while in transition. See where the worker is; new workers are automatically placed where an algorithm thinks they will do good. Perhaps that river square to the north of the city might be a better place. Click on the "horse" square and the worker will disappear from where it was; notice that the citizen's picture in the top left is now an entertainer. Now click on the river square just north of the city. You will see that the worker will now produce the same two food, but one trade instead of one production. Also see that the second box on the left now shows one "gold" and one science. The plains square with the horse is probably the best place; click on the worker in the river, and again on the plains square.
| The right third of the window deals with production. A city is created automatically producing some sort of defensive unit, but at this point in your game growth may be a better idea. The city is producing a Phalanx; next to it the numbers "0/20" show that it is will take 20 production points to make it, and no work has been done yet. The "Buy" button (grayed out now) allows you to rush production on something. |

|
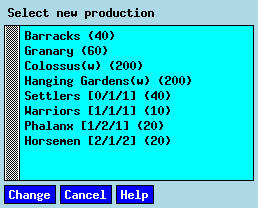
| The "Change" button lets you redirect production; click on it. A list will pop up, showing all of the units and buildings which you may order the city to produce at this time in the life of the city and your empire. Beside each one in parentheses is the number of production points needed to make it. Beside the units are three numbers, such as the Phalanx's "[1/2/1]"; these are the unit's ability to attack, defend, and move, respectively. Click on the Warriors line, and the line will turn black; click on the "Change" button and the selection is made; now see on the main city window you will need ten points to build the Warriors. |
|
Below the current production line is a box containing all of the buildings current built in the city; though small now, in time you may need to scroll it to see all of them. At this point it contains only your Palace. Below that is the "Sell" button, which you can use to sell buildings. Don't sell your Palace; you won't really have a capital city and will lose some vital advantages.
At the bottom of the window are some control buttons: Close, Rename, Trade, Activate Units, Unit List, and City Options. These will be dealt with in the reference. For now, click on the Close button.