In this section you will start a solitaire game of Freeciv and learn the basic concepts of controlling your race. All of this document assumes that Freeciv is installed in its default directories, and that the executables are in your PATH.
There are at present two versions of the client. One is called the "Xaw Client", made to use the Athena widget set that comes with the X window system. It is the default client since the Athena widgets are nearly always available. The other is called the "GTK Client", made to use the Gtk+ widget set. They have the same windows and controls, but the Gtk client has better looking windows. It is not part of the standard 1.8.0 distribution, but is available at the Freeciv site ftp.freeciv.org. Either one or the other will be installed, mostly depending on whether your system has Gtk+ installed. For the most part, this tutorial will have examples from the Xaw client.
In an xterm or other window, start the server and give it some parameters:
        civserver --nometa
        Freeciv version 1.8.0 server
        1: Now accepting new client connections
        Get a list of the available commands with 'h'.
        > set seed 5
        > set randseed 5
        > set aifill 7
Those parameters will produce an environment which will match this
tutorial. Leave that running for now, go to another xterm, and type
civclient &
|
|
|
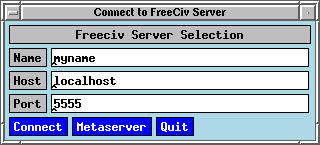
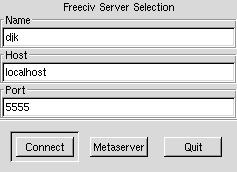
There are options that you may use later, but for now leave them out. The client will start, display the main client window, and along with it the connect window. (Here is the one place in the tutorial in which both the Xaw client, on the left, and the Gtk client, on the right, are shown. As you can see, they show the same information but in different styles.) You may leave all of the fields at their default values this time; just click on "Connect". (Throughout this manual, "click" means a single left click.)
|
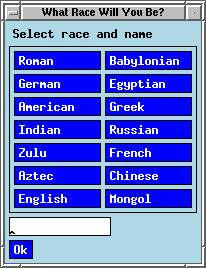
Go back to the xterm with the server running; you will see a message indicating your client connecting. Type the "s" command to the server to start the Freeciv game. Look back at the client window; you won't need to look at the server window again until you are done with the game. The client will now display the race selection window. Click on "Roman." "Caesar", the default ruler name for that race, will appear in the box at the bottom; if you don't like it, click on it and replace it. Click on the "Ok" button. |
|
|
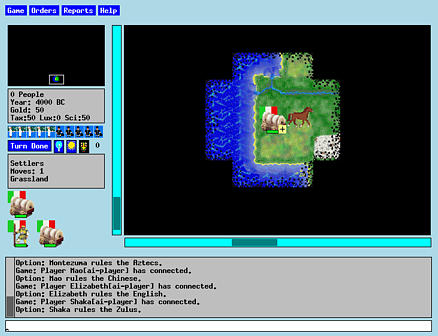
Now the main client window will be filled in with the world as you know it. We'll go through it part by part. The first thing you should do, however, is click and hold on the "Help" menu button on the top line; you will see a wealth of topics for which there is online help. Move the cursor down to the topic of your choice and that help window will appear. There is online help for essentially all of the game's concepts and features. |
|
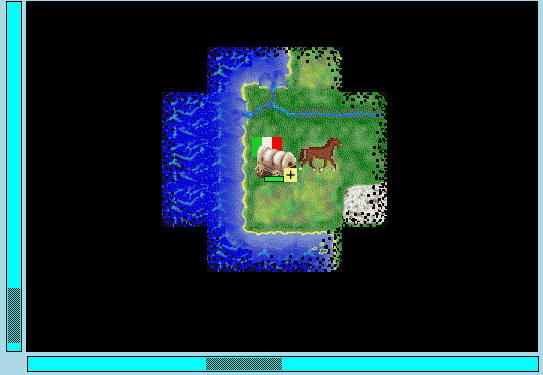
| The upper right is a scrollable map of the world around your initial units. The default world is 80 squares across and 50 squares high, but this viewport only shows a segment 11 by 8 squares. Each square you see filled in contains a representation of the terrain in that portion of the world's surface. |
|
The flashing square in the middle is alternating between the terrain of that square and the icon of the currently active unit. The terrain types which you see are a sample of those in the world; your initial units are on a Grassland square, with Plains squares just to the south, east, and southeast of your units, and one north of the middle of the river. Just to the north of your units is a River square, with two more Rivers to its east. Off to the far southeast is a Tundra square. Surrounding your coast to the west is a number of Ocean squares.
Many map squares have special resources; in this case, there is one. The Plains square just to the east of your units has a Horses symbol; such a square has higher food productivity than an ordinary Plains square. How can you tell what the squares contain if you aren't familiar with the symbols? Put the cursor over the Horses square, and press and hold the middle mouse button; you will see a tiny window saying "Terrain: Plains (Horses)". Do the same in the square with your units; you will get a line describing its terrain, another identifying the unit on the top of the stack there, and another giving the unit's critical statistics (attack, defense, firepower, and hit points).
But first, note that much of the map is black, apart from the 21 squares in the center. These are squares of which you know nothing; you will not see what is in them until you have a unit close enough to report on them. What of the world beyond your 11x8 viewport? Move your cursor to the horizontal scrollbar below the map, and single left click. This shifts the map one square to the left, exposing more black squares on the right. A single right click will shift the map one square to the right. A single middle mouse click on the scrollbar will jump the map to that relative position on the entire world map. The vertical scroll bar adjusts the map height similarly. Or, instead of using the scrollbar, you can simply point to a square on the map and use a single right click; the map will be recentered around that spot. At present, there is little to see.
Find your way back to where your units are. A shortcut for this is the "c" key, which will move the map to place the active unit in the center of the map. This and other shortcut keys you will use a lot. We'll leave the units for later.
|
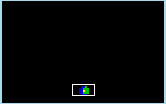
In the top left corner of the client window is an area which is mostly black, with some colored squares within. This is a map of the entire world, in a resolution so small that individual terrain squares are indistinguishable. It has a yellow dot flashing in time with your current unit. At this point it has no value, other than showing that your starting location is at the far south of the "middle" of the world. Once you have a world-spanning empire it will come in handy. On the real Earth map, if you have the detail map showing Europe, for instance, you would need many scroll clicks to adjust it to look at South America. But one click on the corresponding place in the overview map will shift the detail map to centered on the selected position. |
|
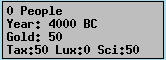
| Immediately below the overview map is the initial economic summary for your empire. It shows your total population, the current year, your treasury, and the percentages you have allocated to taxes, luxuries, and science. |
|
| Below that is a row of ten tiny boxes. They represent the division you have between luxuries, research, and taxes. The default rates are no luxuries, 50% research, and 50% taxes, so what you see are pictures for five researchers and five tax collectors. if you reduced taxes to 40% and increased luxuries to 10%, the pictures would show one entertainer, five researchers, and four tax collectors. |
|
Let's change things to do research a bit faster. There is no need for taxes at this point. There are two ways to change the distribution of effort in your empire. One is through the "Game" menu item called "Rates". The other is through this icon bar. Click on the first tax collector. That will change it to an entertainer, and move it to the far left of the line (since it always shows entertainers, then scientists, then tax collectors). Click on that far-left entertainer, and it becomes a scientist. You can also look at the information box above and see the new percentages.
What if you try to exceed the maximum amount of research (or any other choice) allowed for in the rules? Try it: Click on another tax collector to make it an entertainer, then click on the new entertainer. The icon doesn't change, and you get an error at the bottom of the window: "Game: Science rate exceeds the max rate for Despotism." This is how you get errors returned from the server; your client tried to make the change, but the server rejected it. Change a scientist into a tax collector, and you can change the entertainer back into a scientist.
| Below the economy line is a line with five items. The first is a button labeled "Turn done". You will click on this to indicate that you have made all of your moves for a turn. The next is a lightbulb, which indicates the progress in your research efforts towards the next civilization advance; the lightbulb gets brighter from turn to turn to show this. Next to it is a sun, which is presently clear and bright; once you have industry and pollution, episodes of pollution will make it brighter to warn of the approach of global warming. Next is a symbol representing the form of government you presently have, which is Despotism. Last is a number, which in multiplayer games shows the time left in the turn. |
|
|
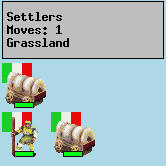
Next lower on the left column is information regarding the currently selected unit.
It shows the kind of unit, whether it is a veteran, the number of movement points it
has left to use,
and the terrain on which it is presently standing.
Below the textual information is an icon of the kind of unit it is. At this point you should have two Settlers and an Explorer; one Settler is currently selected. Below the icon of the current unit is a row of icons, one for each of the other units stacked in the same square; in this case they are the Explorer and the other Settler. As you see, your unit icons are made up of a few parts: a picture, in this case a covered wagon for a Settler and an outdoorsman with a walking stick for an explorer; and your national flag, in this case the green-white-red of modern Italy. You will use the flags to recognize friends and enemies in the game. Superimposed on the bottom center of the picture is a green rectangle; this is the unit's health status, the green showing complete health. |
|
| At the top of the Freeciv window is a row of menu buttons; on each one, point to it, press and hold the left mouse button, and you will see the kind of controls each deals with. Move the cursor away from the menu and release the mouse button to dismiss the menu. |
|
|
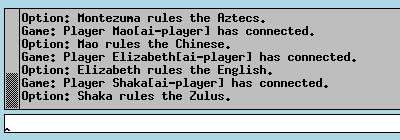
Near the bottom of the window, below the unit icons, is a large rectangular
area with messages.
It contains all messages sent to you from the server.
It has a scrollbar to allow you to scroll back to see older messages than those
which fit in the window.
At the very bottom is a single line. This is the multiplayer "chat" line, to communicate with other players. It will be left for the reference section. |
|