Animate Your Avatar
3D Design Conference – June 5, 1997
Robert W. Saint John
Integrated Data Systems
rsaintj@earthlink.net
Introduction
Instead of taking the approach of building what
is traditionally known as an avatar in VRML, we'll be looking at
creating something more akin to a "virtual human". At the time
of this writing, the world of multiuser (MU) in VRML is in a state of flux.
Although a number of people are working on standards for avatars (such
as the Living Worlds and VRML
Humanoid Animation working groups), nothing is firmly established within
the VRML97 specification
relating specifically to MU.
 For
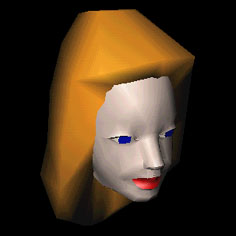
the purposes of this class, therefore, we will be looking at creating a
humanoid figure within the constraints of the VRML spec. The character
to the left is Nutshell, a cyber android character created by author/artist/MU-guru
Sue Wilcox. My thanks to her for giving me something from which to work!
For
the purposes of this class, therefore, we will be looking at creating a
humanoid figure within the constraints of the VRML spec. The character
to the left is Nutshell, a cyber android character created by author/artist/MU-guru
Sue Wilcox. My thanks to her for giving me something from which to work!
For tools, I used a combination of existing bits
and pieces from Viewpoint Datalabs 3D geometry libraries, trueSpace 2.0,
and IDS's V-Realm Builder 2.0. This course is a 10 step exercise, and I've
included the most relevant bits of code for each step here. In addition,
each step has a corresponding VRML world which you are free to examine
in a VRML browser such as WorldView 2.0 or Cosmo, or download and examine
in a text editor.
Step 1 – Geometry
 I
started off by assembling my bits and piecews of modeling, and converted
them to VRML 2.0 by importing them into the Builder, resulting in this
file. I set up the entire figure underneath a single Transform. When the
files are converted to VRML, nearly everything ends up at the same level
of the hierarchy, meaning that all objects are separate and unrelated.
Also, none of the groups or geometry are named (or DEF'd), making the file
difficult to read. This will have to be changed in our next step.
I
started off by assembling my bits and piecews of modeling, and converted
them to VRML 2.0 by importing them into the Builder, resulting in this
file. I set up the entire figure underneath a single Transform. When the
files are converted to VRML, nearly everything ends up at the same level
of the hierarchy, meaning that all objects are separate and unrelated.
Also, none of the groups or geometry are named (or DEF'd), making the file
difficult to read. This will have to be changed in our next step.
Transform {  # Entire File Transform
            translation 0 0 0
            rotation    0 1 0  0
            scale       1 1 1
            center              0 0 0
        children Group {
                children [
                    Transform {   # Beginning of the Hierarchy for the Upper Body
                            translation 0 0 0
                            rotation    0 1 0  0
                            scale       1 1 1
                            center              0 0 0
                            children [
                                Transform { # Transform for the Torso
                                    translation 0 0 0
                                    rotation    0 1 0  0
                                    scale       1 1 1
                                    center              0 0 0
                                    children [
                                        Shape {
                                                appearance      Appearance {
                                                        material        Material {
                                                                ambientIntensity        0.5
                                                                diffuseColor    0.77 0.78 0.86
                                                                emissiveColor   0.096 0.107 0.18
                                                                shininess       0.8
                                                                specularColor   1 1 1
                                                        }

                                                }

                                                geometry        IndexedFaceSet {
                                                        coord   Coordinate { …

                                            }

                                    }

                                    Group {
                                            children [
                                                Transform {…
Step 2 – Label (DEF) and arrange the hierarchy
The next step is to reorganize the file in a logical
fashion, and label the groups accordingly. Here is the revised VRML
file. Here is a summary of the groups, how they can be labelled for
readability, and a logical organization. For instance, note that all components
of the left are are gouped under a single Transform. When the LEFT ARM is
rotated, the LOWER LEFT ARM and LEFT HAND will follow accordingly
(i.e., forward kinematics).
#VRML V2.0 utf8

BODY Transform
        UPPER BODY Transform
                TORSO Transform
                        ARMS Group
                                LEFT ARM Transform
                                        LOWER LEFT ARM Transform
                                                LEFT HAND Transform
                                RIGHT ARM Transform
                                        LOWER RIGHT ARM Transform
                                                RIGHT HAND Transform
                        NECKUP Transform
                                NECK Transform
                                HEAD Transform
                                        HAIR
                                        LIPS
                                        EYES
        LOWER BODY Transform
                HIPS Transform
                        LEFT LEG Transform
                                        LOWER LEFT LEG Transform
                                                LEFT FOOT Transform
                        RIGHT LEG Transform
                                        LOWER RIGHT LEG Transform
                                                RIGHT FOOT Transform
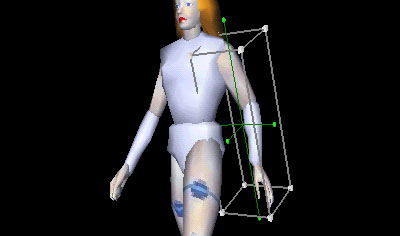
Step 3 – Adjust the center of rotation for
each limb
 The
majority of transformation within a humanoid figure is a matter of rotation.
In most cases, the center of rotation for this figure is not related to
the joints. In order to easily manipulate limbs for posing and animation,
we'll want to adjust the center of rotation for each limb.
The
majority of transformation within a humanoid figure is a matter of rotation.
In most cases, the center of rotation for this figure is not related to
the joints. In order to easily manipulate limbs for posing and animation,
we'll want to adjust the center of rotation for each limb.
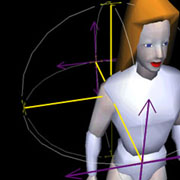
In this example of code,
for instance, we'll move the center of rotation of the left upper arm from
the center of the geometry, to a position up and over, where the shoulder
meets the torso. The screen capture to the left shows the change being
made with V-Realm Builder's Centerball Manipulator.
    DEF ARMS Group {
            children [
                DEF L_ARMXFORM Transform {
                        translation     0 0 0
                        center          1 4 0
                        children DEF UPLARM Group {
                                children [
                                    Shape {
                                            appearance  Appearance {
                                                    material    USE CHROMIUM
                                                    texture     DEF skin ImageTexture {
                                                            url "texture/Skin.jpg"
                                                    }
The hierarchy is now set up, the individual body
parts are labelled, and rotations are set so that limbs will "bend"
at the joints. The figure is complete at this point. Now we can move on
to setting up an interface, and assign behaviors and animation to our virtual
human.
Step 4 – Viewpoints, Navigation and World Info
At this point, I add some miscellaneous info to
my world with the WorldInfo node, and add NavigationInfo's headlight setting
to TRUE (so that the figure is always illuminated,. regardless of position
of the viewer). I also want to be able to set up a few controllable Viewpoints
that represent the different ways we can view our character... one view
from the front, one from her point of view (eye level), and a "Mario-style"
above and behind view. If you open this world,
you can navigate around the Viewpoints.
WorldInfo {
        info    "by Robert Saint John"
        title   "CyberAndroid  a character by Sue Wilcox"
}
NavigationInfo {
        headlight       TRUE
}
DEF FRONT Viewpoint {
        orientation     0 1 0  0
        position        0 0.8 15
        description     "FRONT"
}
DEF POV Viewpoint {
        orientation     0 1 0  3.14159
        position        0 5.2618 1.4
        description     "POV"
}
DEF ABOVE Viewpoint {
        orientation     -0.00466 0.9687 0.2479  3.130
        position        -0.056 10.447 -12.764
        description     "ABOVE"
}
DEF BODY_XFORM…..
Step 5 – Controls / Triggers
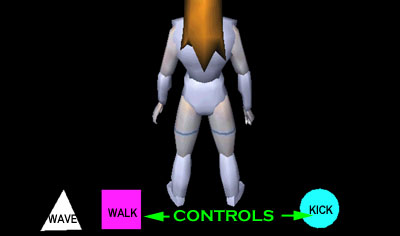
At this point, I want to make a VRML interface
with which to manipulate the avatar's actions. I'll do this by setting
up a group of shapes with their own TouchSensors, which will later act
as triggers to appropriate behaviors. I use very basic shapes here, but
they can just as easily be a hand for "wave", feet for "walk",
etc.. A basic setup of a trigger looks like this. Note that I also moved
the Walk Viewpoint within the same group as the control itself. When my
figure later "walks", and I am viewing her from behind, I want
the Viewpoint to be carried "along" with the avatar as well as
the controls. At this point, the VRML file has
the controls set up as TouchSensor triggers, but no actions have been established
or routed to them.
DEF CONTROLSXFORM Transform {…
    children DEF CONTROLS Group {
            children [
                DEF WALK_BUTTON Transform {…
                        children [
                            Shape {
                                    appearance  Appearance {
                                            material    Material {...
                                            }
                                    }
                                    geometry    IndexedFaceSet {…
                                                            }
                                                    }

                                                    DEF WALK_BUTTON_TS TouchSensor {
                                                    }

                                                    DEF ABOVE Viewpoint {
                                                            position    4 7.2476 21
                                                            description "ABOVE"
                                                    }
Step 6 – Create the Wave Motion, Attach to
Trigger with ROUTE
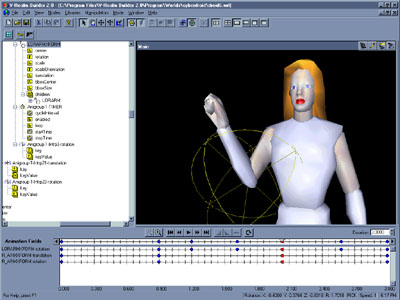
Now I can use a series of Interpolators to create
a behavior... in this example, a waving motion.
I use V-Realm Builder's KeyFrame Editor to set up a 3 second animation
which involves raising the whole arm a bit, and rotating the forearm (and
hand) back and forth in a waving motion. The code below shows the TimeSensor
which sets the duration of the behavior, an example of Interpolators that
govern the waving motion, and the ROUTEs that tie it all together. Note
that the first of the ROUTEs is where I establish that the triangle "wave
button" is a TouchSensor, which when clicked starts the Timer, which
initiates the Interpolators. All of our behaviors will be set up in a fashion
similar to this (note that the Builder automates the process of creating
the Timer and the ROUTEs involved... this information would otherwise have
to be created by handcoding).
DEF Anigroup-1-TIMER TimeSensor {
            cycleInterval       3
            enabled     TRUE
            loop        FALSE
            startTime   0
            stopTime    0
    }

DEF Anigroup-1-Intrp3-rotation OrientationInterpolator {
            key [ 0, 0.299492, 0.399323, 0.539763,
                      0.678511, 0.85956, 1 ]
            keyValue    [ 0 0 1  0,
                              -0.428061 0.60274 -0.6734  1.26282,
                              -0.416494 0.285471 -0.863156  1.50759,
                              0.734636 -0.595966 0.324245  4.40555,
                              -0.0916499 0.439418 -0.893595  1.59845,
                              0.757358 0.466027 -0.457414  0.934728,
                              0 0 1  0 ]
    }
DEF Anigroup-1-Intrp21-translation PositionInterpolator {
                key     [ 0, 0.299492, 0.678511, 1 ]
                keyValue        [ 0 0 0,
                                  -0.292778 -0.0267401 -0.0598152,
                                  -0.235766 0.0314888 0.0253434,
                                          0 0 0 ]
        }
....


ROUTE WAVE_BUTTON_TouchSensor.touchTime TO Anigroup-1-TIMER.set_startTime
ROUTE Anigroup-1-TIMER.fraction_changed TO Anigroup-1-Intrp3-rotation.set_fraction
ROUTE Anigroup-1-Intrp3-rotation.value_changed TO LORARMXFORM.set_rotation
ROUTE Anigroup-1-TIMER.fraction_changed TO Anigroup-1-Intrp21-translation.set_fraction
ROUTE Anigroup-1-Intrp21-translation.value_changed TO R_ARMXFORM.set_translation
ROUTE Anigroup-1-TIMER.fraction_changed TO Anigroup-1-Intrp23-rotation.set_fraction
ROUTE Anigroup-1-Intrp23-rotation.value_changed TO R_ARMXFORM.set_rotation
Step 7 – The Walking Script
Time to set up our next behavior, and ROUTE it
to the second control, the Walk trigger. This is a more complex behavior
in many ways. Number one, the motion of walking is one that obviously causes
the entire avatar moving forward. But it also involves the behavior of
"striding" (arms swinging, legs moving). In this step, I only
want to worry about forward motion.
In addition, I want to be able to stop my character's
walk at any time. VRML TouchSensors and Interpolators can trigger an animation,
but they can't necessarily stop one. For instance, a VRML door can have
a trigger set up on the door handle to set up an animation of the door
rotating open. But a second click on the door handle will only cause the
door to run through the same "dumb" animation again. To have
a second click "close" the door requires the introduction of
logic. Logic can easily be achieved in VRML through the use of JavaScript
(or, as it is sometimes referred to in VRML, VRMLScript).
Below is an example of a simple Boolean script....
TRUE equals walking, FALSE equals stopped. The script is linked via ROUTE
to the enabled field fo the Walk Timer... the clock which runs the
animation of the figure moving forward is either enabled by a click, or
diabled by a second click. The whole thing, in the end, is ROUTEd to the
entire Avatar Transform.
Note that, in this VRML file,
I placed a box in front of the avatar to know that she was moving forward
in this otherwise empty environment. I will remove it later. Also, I've
set up this behavior based on the VRML file in Step 5, not Step
6. Because my avatar will have multiple behaviors and multiple clocks running,
it's best to set each on up separately, and cut paste the multiple behaviors
together in the last step.
DEF WALK_TIMER TimeSensor {
cycleInterval   15
enabled FALSE
loop    TRUE
startTime       0
stopTime        0
}
DEF WALKSCRIPT Script {
url     "vrmlscript:

function set_boolean ( bool, eventTime ) {
   if ( bool == false) { return; }
   if ( value == true ) { value = false; }
   else                      { value = true ;}
   value_changed = value;
}
"
field  SFBool value     FALSE
eventIn  SFBool set_boolean
eventOut  SFBool value_changed
}    ]
ROUTE WALK_BUTTON_TS.isActive TO WALKSCRIPT.set_boolean
ROUTE WALKSCRIPT.value_changed TO WALK_TIMER.set_enabled
ROUTE WALK_TIMER.fraction_changed TO Anigroup-1-Intrp7-translation.set_fraction
ROUTE Anigroup-1-Intrp7-translation.value_changed TO AVATAR_XFORM.set_translation
Step 8 – Animating the Stride
Next I want to animate the striding motion of
the character as she moves forward. I chose to do this separately from
the forward motion because I want the stride governed by a different Timer.
The forward motion above is set up to cycle in an interval of 15 seconds.
But a striding motion can be effectively simulated in only 3 seconds, and
looped. I will, however, use the same walk control trigger.
DEF STRIDE_TIMER TimeSensor {
cycleInterval   3
enabled FALSE
loop    TRUE
startTime       0
}
ROUTE WALK_BUTTON_TS.touchTime TO STRIDE_TIMER.set_startTime
ROUTE STRIDE_TIMER.fraction_changed TO STRIDE_Intrp22-rotation.set_fraction
ROUTE STRIDE_Intrp22-rotation.value_changed TO L_ARMXFORM.set_rotation
ROUTE STRIDE_TIMER.fraction_changed TO STRIDE_Intrp24-rotation.set_fraction
ROUTE STRIDE_Intrp24-rotation.value_changed TO LOLARMXFORM.set_rotation …
Step 9 – The Kick
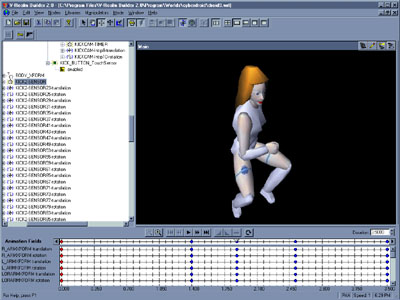
This step is definitely not for the timid,
and probably would be a nightmare to code by hand. But using the Builder,
I set up a complex animation linked to the third control, the Kick Trigger.
Again using the KeyFrame Editor, I set up a sequence in which the figure
slowly crouches, pulls her arms inward, pauses for dramatic effect, then
quickly stands and kicks her leg up into the air. As you can imagine, nearly
every limb is transformed in some fashion to pull this off. For anyone
attempting to do an animation like this, I suggest two things:
- Run through the action yourself in real life,
taking note as to what you're doing with your legs, arms, torso, head,
neck, etc.; this is not only good exercise <g>, but the best way
to determine the cycleInterval of an animation;
- Observe traditional animation techniques like
those in Warner Bros. cartoons... exagerated motion in 3D animation should
often be "over the top" to be most effective.
One other thing I did I'll leave as a surprise.
Just make sure that when you go into this world,
go to the KICKCAM viewpoint before triggering the animation!
    DEF KICKCAM_XFORM Transform {
            translation 0 0 0
            children [
                DEF KICKCAM Viewpoint {
                        position        -6 7.2476 21
                        description     "KICKCAM"
                }
                        DEF KICKCAM-TIMER TimeSensor {
                        cycleInterval   3.5
                        enabled TRUE
                        loop    FALSE
                        startTime       0
                }

                DEF KICKCAM-Intrp8-translation PositionInterpolator {
                        key     [ 0, 0.55, 1 ]
                        keyValue        [ 0 0 0,
                                          29.9673 19.2357 -30.0763,
                                          -9.25986 14.2436 -56.4332 ]
                }
                DEF KICKCAM-Intrp10-rotation OrientationInterpolator {
                        key     [ 0, 0.5, 1 ]
                        keyValue        [ 0 0 1  0,
                                  0.100094 0.8489 0.518989  1.59133,
                                          -0.00235904 0.948588 0.316505  3.05291 ]
                }
            ]
    }
    DEF KICK_BUTTON_TouchSensor TouchSensor {
    }
Step 10 – Combine All Elements
As I mentioned above, the final step is to combine
all these behaviors into one VRML file. Pay close attention because in
some cases you'll have multiple Interpolators governing different behaviors
within the same Groups/Transforms. Here is the final build of the avatar,
in both an uncompressed (368kb) and compressed
(60kb) versions.
Case Study – The Cyber Android in a World
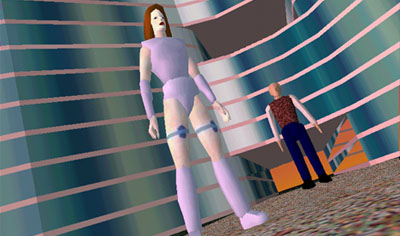
Needless to say, the motions of waving, walking
and kicking are much more interesting in the context of a world,
so I've added our finished avatar to this world that looks mysteriously
like Oracle's headquarters. Please don't kick the Larry. This world is
available in both an uncompressed (608kb) and
compressed (107kb) versions.
Thanks to Cynthia Connors at 3D Design/Miller-Freeman,
Bill "Billo" McCloskey at Silcon Graphics, and Sue Wilcox for
their help and assistance in putting this class together. Anything that
seems weird or doesn't work here should not be attributed to them. Anything
that seems weird or doesn't work (or any general comments, questions) can
be sent to me directly at:
Robert W. Saint John
Administrator of VRML Development
Integrated Data Systems
1475 Folsom Street, Suite 200
San Francisco, CA 94103
rsaintj@earthlink.net