

Quick-start guide pt 2
Adding Objects
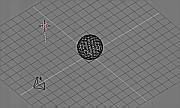
Place the 3D cursor one grid unit above the plane. Do this by switching between Top View (PAD_7) and Front View (PAD_1).Press SHIFT+A. This calls up the ToolBox in "Add" mode. Choose the menu item "ADD->Mesh" by pressing LeftMouse. Now the options change to a list of primitives. Choose "IcoSphere". The ToolBox disappears and a small number requester pops up. Enter a sub-division level by clicking on the left or right side of the button (3 is a nice value). Then press "OK" or ENTER.
Located around the 3Dcursor, a new Object with a Mesh has been added. The Object is automatically in EditMode, so the vertices and faces of its Mesh can be changed.
We won't do this now. We leave EditMode by pressing TAB.
Now, we have 3 Objects. You can select these with a RightMouse click, somewhere near the wireframe.
The next step is adding a light. Place the 3D cursor somewhere outside the sphere. Maybe 3-4 grid units away.
Press SHIFT+A. The ToolBox always returns as you previously left it. In this case at: "ADD->IcoSphere". To go back to the main "ADD" options, click with RightMouse or move the mouse cursor to the left side of the ToolBox. Then choose: "ADD->Lamp".

Click to enlarge
Now a Lamp Object has been added at the 3Dcursor. This type of Object doesn't have an EditMode.
Press PAD_0 to view from the camera. From this view, Objects can be selected too.
Make a nice composition by using the 'Grabber': press GKEY, move the mouse and click LeftMouse. The Camera can be moved from this view as well.
When you are satisfied, you can render an image: press F12.
Rendering a simple scene like this is fast, but you should notice that it is blocking; the mouse cursor changes into a red filled square displaying the current frame number.
The rendered image overlaps the 3D view. To get rid of it: press ESC or F11. To view the image again: press F11.
It's as easy as that!
Material properties
It is time to do something with the ButtonWindow at the bottom of the Screen.This ButtonWindow has a header at the top (to shorten mouse movements). In this header you see a row of icon buttons. These buttons indicate the available button groups.
First go to the MaterialButtons. Press the icon button displaying a red sphere.
Then, in the 3DWindow, select with LeftMouse the Object "Plane". Notice that the Material buttons always shows the active Object.
The complete buttons will be explained in a later chapter. Just for now try to locate these sliders:
- "R" "G" and "B": the colour components.
- "Ref": reflectivity.
- "Spec": specular (shine) component
- "Hard": hardness, the specular size.
Back in the 3DWIndow, select the Object 'Sphere' (using RightMouse). This newly added Object doesn't have a Material yet. To assign a Material we must use the 'menu' button in the Buttons header:
Press and hold this button. Now a menu pops up with 2 choices:
- 'Material': you can assign the same Material as already used by 'Plane'.
- 'ADD NEW": add a new Material block.
Make a quick rendering to look at the new Material appearances (F12). Note that the 'Sphere' still is rendered faceted. Smoothing by normal interpolation is a not a Material property. Actually, it is a Mesh property and can be indicated for each face separately.
Go to the EditButtons (F9) and press the button: "Set Smooth".
Make a rendering - F12 - to see the result.
-> on to Part 3